Saturday, October 18, 2014

A Trip to Filkins


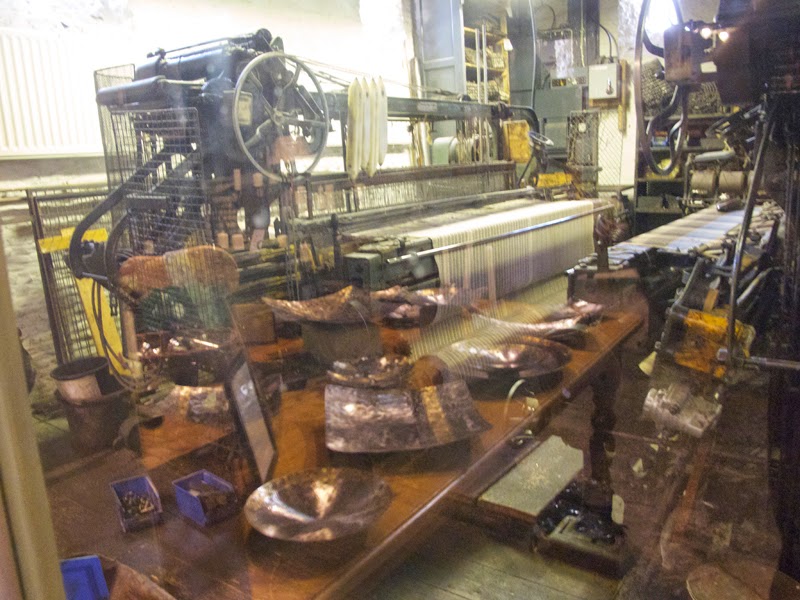
Though I've known about it for a long time, I only just recently made a trip to the Cotswold Woolen Weavers  in Filkins, which is a tiny village about 25 minutes drive from me. CWW is a bit of an anomaly; it's a cluster of buildings comprised of retail shops, artist's workshops and a wool and weaving museum, with a nice little cafe thrown in for good measure. I visited CWW twice, and both times found it oddly empty, yet also unmistakably vibrant and alive. Wandering through the various rooms and buildings felt like I'd stumbled upon some well kept secret. In some of the buildings there were employees, but in many of the rooms I was on my own, occasionally crossing paths with other visitors. No one was ever overly solicitous or hawkish; I felt free to wander and explore everywhere, from the museum with its scattering of textile related bits (baskets of wooden loom bobbins, rams horns and raw, chocolate brown fleece, embroidery samplers and old fashioned looms,) to the rooms upstairs selling a huge selection of old timey games and quirky books. There were open shelves filled with leather bound, swatch filled books. I could peek inside of glassed in rooms that contained huge work tables with tweed swatches and industrial looms. Different bits of the store carried different things; in addition to all sorts of woolen and tweed clothing (jackets, waistcoats, skirts, socks-yawn), there were beautiful blankets, and an assortment of randomly curated, locally produced books and crafts (things made from pewter, things carved from wood, reproduction agricultural posters and spoons and buttons carved from sheep's horns). One shelf leading upstairs was lined with Pantone color chip coffee mugs, which is just the sort of unexpected non sequitur item you'll come across in between sections of the shops. At one end of the building there is a room selling large and very well priced end rolls of woven wool fabric. At another end of the complex of buildings is the sculpture workshop of the artist Simon Brittain, who also offers courses in stone carving and masonry.

CWW is a wonderful place, and really worth a visit if you find yourself in the Cotswolds and have even a marginal interest in wool or textiles. It was the riches from the wool trade that built many a church village in this part of the world. Take a trip to Filkins and soak up a touch of the history behind that period of English life. 

Monday, September 29, 2014

Handmade Baby Toys

My niece will be giving birth to her first child any day now. It seems like no time at all ago that my brother's phone call woke me up one morning to spread the good news of his own child's arrival, and now that girl is going to be a mom. Time has wings! With the due date quickly approaching, I recently set out to make her a blanket, and thought, "While I'm at it, maybe a soft toy, too." Then-how about some sweet little felt booties? Ooh, and a rattle! The baby needs one of those. And finally, a little tag edged blanket toy with some crinkly plastic inside, for some sensory thrills. Apart from the large blanket, which turned out to be a bit of white whale, and the bunny, which took a couple of hours to finish, these toys can be whipped up in fairly short order. Links to any patterns or tutorials I used are indicated in the captions below each of the photos that follow.
I've made many a bunny for babies, both for my own kids and for friends. The pattern and instructions for this bunny came from Martha Stewart. Her project calls for using men's suiting fabric, but I always use felted cashmere. 
I made this egg from a pattern in last year's easter issue of Making Magazine, which is published here in the UK. But patterns for stuffed sewn eggs abound online, so just google it. I hacked the instructions by placing four little bells inside a piece of muslin, which I sewed securely shut. Then I stuffed the bell pouch in between layers of egg stuffing, as in the middle of the egg as I could get. Because of the stuffing the bells make a shaky rather than tinkly sound.
These adorbs and easy to assemble felt booties are from the fab folks at The Purl Bee. This blog is hands down one of the best sewing and knitting sites I know of. And whenever I go back to New York, I always, always make a trip to Purl Soho to stock up on fabrics and notions, and take in the general air of handmade gorgeousness that permeates the entire space.
This little tag blanket/toy was something I whipped up on a whim. I sandwiched some bias tape and ribbon loops around the perimeter and in between two pieces of fabric (each about 6"x8", right sides facing), added a layer of crinkly plastic to the top, and sewed all the way around with a half inch seam allowance. I left a four inch opening for turning right side out, then ladder stitched the opening closed.
I'd started the blanket quite a while ago (not knowing who it'd be for), so had a beginning with some rectangles of felted cashmere for the top. Browsing through a recently purchased copy of a Merchant and Mills sewing book, I saw instructions for making a double sided blanked with mitred corners and went for that to finish it. Unfortunately, the instructions weren't so clear to me, and I made a mess of the whole thing. After a grumbling hour or so with a seam ripper, I started again. There are many online tutorials for this technique, but the one I found most useful in terms of visual instruction came from Simple Simon and Co. In the end my border was a little wonky, since I'd already cut the corners off in my first attempt at this. And because I used a bulkyish, pieced, top layer instead of a single piece of fabric, the blanket will probably be put to better use as a playmat.

If you have a favorite baby gift you either given or received, please feel free to share in the comments below.


Monday, September 22, 2014

Hedgerow Medicine


More and more, I find myself hesitating before buying just about anything, asking myself first: Can I make this? And more and more (but not always-not by a longshot), the answer is yes. My children find this habit both annoying and matter of fact. Passing through a display of Christmas ornaments, for instance, is often a drag for them, as just about anything they hold up with their little fingers and doe eyes, elicits a response along the lines of: "You know what? We have all the stuff for that at home-lets go make our own snow globes!" Which we did last year; resulting in an entire fleet of jars filled with water, glycerine, glitter and, um, army men glued to the lids. Some handmade projects works better than others. On the other hand, when one of my boys becomes enthralled with a particular new thing-say, Thor, they expect me to quickly and easily whip up a helmet, cape and mallet to suit the occasion. If pressed, I could do this, but again, some projects work out better than others.

Lately I'm trying to learn what I can about making home remedies. For serious ailments, I stick with doctors. I would not, for example, try to treat an asthma attack with herbs, and one of my boys has epi-pens at the ready at home and at school for his peanut allergy. But for common complaints that drugstore medicines, in my experience, don't really help (trouble falling asleep, a worn down immune system, a cough in the night), I'm looking into the hedgerows and fields. I'm starting out simply and carefully, with easy remedies like chamomile and elderberry syrups, rasberry leaf tea, lavender compresses and hawthorn berry leathers.

When I first started looking to see what medicinal plants grow around me, I was thrilled at the sight of the ubiquitous purple flowered thistles everywhere-"I'll never buy milk thistle extract again!" I thought. But upon more careful inspection of the plants I'd seen, I realized that they weren't milk thistle at all. Similarly, cow parsley and deadly hemlock look very similar. So I'm using lots of caution as I go. It'll likely take me many seasons of watching the flowers, berries and leaves around me come and go before I try anything more advanced than an simple tincture or decoction. But it's exciting to realize just how much healing power is out there, every year, in those humble hedgerows.

Tuesday, September 16, 2014

Plant Dyed Wool: Day 3-Weaving on the Brinkley Loom

 I wish I could tell you that I made this gorgeous wall hanging on my last day of Jane Meredith's plant dyed wool course. Alas, I did not. But I did spend most of that day learning how to weave using the Brinkley loom, on which this beauty was made. (Or perhaps it was in fact made on the peg loom, which I posted about earlier. I'll have to check with Jane on that.) I also had the opportunity to do some wet felting later on in the afternoon, photos of which are below.
 Here is the loom, warped up and ready to use. This one is a bit shorter than the ones Jane sells, and I managed to just about finish weaving an entire length. I stuck to blue and white wool for this project, because it's such an idiot proof color combination.
Though I kept my color palette very limited, I did experiment with different widths and textures of wool. In the photo above you can see some carded fleece I added, which gives a lovely texture to an otherwise very flat piece.
More blue. More white.
My next door loom mate Rachel very cleverly warped her loom in alternating blue and white yarn, so she was able to make a very awesome, advanced looking plaid.
After lunch I took a break from weaving to do some wet felting, which I'd only done once before many years ago. It was work! But I loved these beautiful earth tone merino wools and made a pretty wool bowl, pictured below on the left.
 That's me in the pink shirt. See? I like color.


And here is my very own Brinkley loom that I bought from Jane at the end of the course. Warped and ready to weave. With-what?! More brown and white wool. For Christmas this year, I'm going to be needing an alpaca or two. 

Saturday, September 13, 2014

Plant Dyed Wool: Day 2, Peg Loom Weaving

On the second day of the plant dyed wool class I recently took, Jane Meredith taught us peg looming. I thought maybe all of those loom bands I'd been making with my kids all summer would give me a leg up on this craft, but weaving on a peg loom is actually easier than making a triple single rubber band bracelet. We had beautiful weather the last two days of the course; it was a proper Indian summer. Below is the view of the Wye river, which Jane's house overlooks. 
Peg looms are made from a simple strip of wood drilled with holes and pegged with dowels. It's incredible to think that such beautiful rugs, pillows, wall hangings, etc., can easily be made from such a basic tool. I loved this ragged Cotswold wool rug (below) that Jane showed us, and decided to make something using natural, undyed fleece straight from the sheep's back. 
The trickiest bit of weaving is warping up the loom, which wasn't all that hard to do. Below, my loom is warped and ready for weaving.
Jane demonstrates warping up.
I used a combination of brown, grey and white fleece. Most of the women around me (the course was inexplicable absent of any men) were using the colored wool we had dyed the day before. Because I worried I wind up with a tacky technicolor monstrosity if I started using colors, I decided to stick with the browns and whites.
Below, an example of the right way to use color. Each woman's weaving was so totally unique from anyone else's, it's a shame I didn't take more photos to illustrate the various possibilities.
Here is my finished weaving, which is about the size of a small bathmat. I still can't decide if I like it, but I loved making it!
By the way, if you ever find yourself looking for a place to stay near Hereford, may I enthusiastically recommend a lovely B & B called the Old Rectory in Byford. Audrey and Charles Mayson were lovely hosts, and my room was the perfect haven to return to in the evenings. 
My next and last post about this course will be about weaving on the Brinkley loom. I loved it so much a bought one from Jane, where it's currently in use on my dining room table. 

Tuesday, September 9, 2014

Plant Dyed Wool: Day 1

For Christmas last year my sweetie of a husband gave me the gift of a three day wool dyeing course with the amazing Jane Meredith. Nine months later I cashed in, and have just returned from a blissful long weekend in Herefordshire learning plant dyeing, carding, spinning, weaving and felting. It was completely enlightening and inspiring, and I came home with a beautiful brown fleece, a new Brinkley loom and a bunch of stuff that I made under Jane's expert tutelage.

Below are images from Day 1, was primarily about dyeing. Jane grows the dye plants in her own garden, and all of the wool you see pictured here was colored using these (apart from the indigo bath, which was synthetic, as indigo only grows in very hot climates). Among the plants we used were marigold, madder root, coreopsis, walnut leaves, damsons, dyers chamomile, woad and bilberries. As the wool was drying, Jane showed us how to examine and select a wool fleece (turns out the ones in my shed are pretty useless, as they come from sheep bred primarily for eating), gave a lesson in carding and demonstrated spinning on both a drop spindle loom and a wheel. Because Jane packs so much into each six and a half hour day, I'm dividing this post into three parts. Day two, which I'll post next, was spent weaving on a peg loom.
 Under the tarpaulin, the dye baths get heated up using gas canisters and large, portable burners.
 A sampling of the books Jane keeps on hand about plant dyeing. I've already placed my Amazon order.
 Beatrice and I picked a lot of coreopsis flowers!
 The humble marigold makes a lovely yellow dye.
 Damsons aren't just for jam. This bath gave the wool a very subtle pinkish-purple.
Madder root gives a vast array of reds, depending on the mordant agent used to pretreat the wool.
 We made a lot of yellows!
 Jane unrolls a huge fleece and shows us how to inspect one before buying.
 The takeaway: "Be very choosy about your fleece."
 The indigo bath. Once we got this going, we used it to dip some yellows to make green. Weirdly, you can't get a really good green dye from any single plant!
 Jane squeezing out the woad leaves to prepare the bath. This bath yielded both pale blue and pale green.
 Some of the post-indigo dipped greens.
Some nice carded wool, ready for spinning.

Jane demonstrates drop spindle spinning, something you're never, ever likely to see me do.