Wednesday, January 25, 2012

Whip It Up: Felt Coin Necklace Tutorial


I'm in my studio today trying to work on a new project, but apparently the muse has left the building. Some days are just like that; I'm lacking inspiration and can't seem to get anything on my to-do list done. So instead of trying to force ideas to come where none currently exist, I started playing around with some random materials I have lying around. And without really trying (sometimes I think trying is the worst way for me to do anything), I whipped up this felted coin necklace. It took me about 30 minutes to make. (I already had the felt circles cut out for another thing I'm making, so it might take up to an hour from start to finish.) I really like jewelry, but I'm always losing it (please don't ask me about my engagement ring), so I hesitate to ever buy any. But I really like the way this turned out. I hope you do too, because the chances are pretty good that you'll be getting one for your next birthday.

If you make one of these or something similar, please share your results with me. I'd love to see what you made!

So the first thing I did was cut out a bunch of felt coins. The easiest way to do this is to cut half circles on a folded piece of felt. I happen to have a plastic template with various size circles that I used. If you don't, make your own templates by tracing several different sized circles (mine were 2 1/4", 2", 1 1/2", and 1" across), onto paper, cutting them out, and folding them in half. Then trace and cut them out on the folded edges of felt.


Next I layered them on top of one another til I had a design I liked. Using a glue gun, I attached each coin to the one below it using just a drop of glue. I also used a drop of glue to attach the largest pieces where they overlap with one another to hold the whole thing together in one piece.


Next I flipped the whole thing over. Its still pretty flimsily constructed at this point, so I used some embroidery floss to carefully sew together the largest edges between pieces. I made sure to keep the thread hidden from the front of the necklace by sandwiching the stitches between layers. But in the end the stitches in the back will be hidden also.


Next I attached the string. I chose a mustard colored embroidery floss that complements the gold coins in the necklace. I used all six strings of the floss and cut out a length of about 24". While I wanted the necklace to sit higher up on my neck, I permanently attached the string to the necklace, so it needed to be long enough to fit over my head. You can adjust the length of your thread to suit your taste.


Before placing the thread onto the necklace I ran it under a hot iron to get any kinks out. I placed it on the coins as shown in the photo above, and using the glue gun, attached it with another smaller coin to the back of the necklace. I attached additional coins over the parts of the back where any thread was showing, so the whole thing looks nice and finished, even from the back.


And here is another shot of my creation. Now back to the drawing board with the aforementioned mystery project. Or maybe I'll just go home.


Tuesday, January 17, 2012

Crafting with Jake: Minecraft Magnetic Poetry Board


I love to make stuff with my two littlest boys, but their clumsy little fingers and illiteracy place certain limitations on the types of things they can tackle. Michael and Charlie, two and four years old respectively, are still in the heavy scribbling phase. So no matter how I try to parlay their creative expressions into lasting works of art, most of our projects don’t have a whole lot of staying power. Meaning they eventually wind up in the trash. There. I admit it. I throw my kids’ art away.

(It's not all trash. Michael made this little beauty while Jake and I worked on big boy stuff.)

But Jakie is eight now. (And yes, I still call him Jakie in spite of his advanced years.) His fine motor skills are off the charts, and his mind is an incredibly fertile landscape. Having said that, it’s not like he spends his spare time finger knitting and making short films with my iPhone. He’s a product of his times and his environment as much as any kid, and as such he loves an opportunity to play video games. Minecraft is his current obsession. If you’ve seen this game being played and could perhaps explain its appeal to me, I’d be much obliged. Intentionally stylized to mimic the look and feel of an early 80’s Atari environment, the game involves, to the best of my limited understanding, building worlds and structures with unwieldy looking hunks of rock. Apparently there is also ample opportunity to kill zombies, but I’ve yet to witness this myself. As video games go, this one looks pretty innocuous to me. Also, its not very loud. That might be because I make Jake play with the volume turned all the way down, but I’m not sure.

So recently I thought of a project that I could do with Jake that would satisfy my urge to spend creative time with him, keep his interest and enthusiasm alive, and actually get a little more use than last summer’s tie-dye t-shirt. This magnetic poetry kit was (like everything I have any interest in making), very easy to put together.


Here’s what we used to make it:

1. A roll of adhesive magnetic tape.
This was the only thing I had to buy for this project; it was $3.99 for a 1/2" wide,ten foot long roll.
2. Magnetic bulletin board. I had bought this thing years ago and never put it to use. I think I paid about $15 for it at the Container Store.
Another option (and better bang for your buck) would be the Ikea Spontan magnetic bulletin board for $12.99
Another option is to paint a magnetic board on a section of wall in your child’s room using magnetic paint.
3. A label maker or printer. I happen to have a label maker, which I used to print out the words that go on the magnets. You can get a Brother P-touch for less than $20. If you don’t have or want a label maker though, you have a couple of other options. You can either print out your words onto a plain piece of paper (use an 18 point font for ½” wide magnetic tape), cut them down to size and attach them to the top of the magnetic tape strip, OR, you can write out your words by hand (or in your child’s hand) and similarly cut and attach them to the magnetic strip.

Before we printed out our words we had to decide what they’d be. I asked Jake to brainstorm some Minecraft words and divide them into categories; we needed nouns and verbs in order to make successful poetry. I also made sure we had some conjunctions, prepositions, an extra "s" and an "es". Here is Jake's notebook showing his brainstorming session:


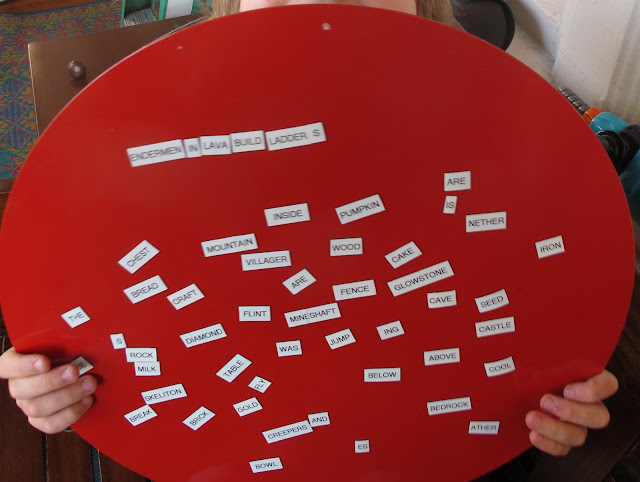
Next we set to work with the label maker. Jake printed out the words, and I peeled the backing off and stuck them onto the magnetic strip. Then I trimmed as needed and stuck 'em on the board.


This project took about two hours from start to finish, and it was a totally stress free affair. The really fun part, of course, was making up crazy sentences using Minecraft parlance. Here was Jake's first line:


This project can be adapted to any theme. For God's sake don't go out and buy those magnetic poetry kits when you can make your own. If you do this project with your wunderkinder I'd sure love to see the results, so please share.


Thursday, January 5, 2012

Make It: Felted Cashmere Eternity Scarf


Here's me at the bank this morning. I'm smiling not because of the balance in my checking account, but because, in spite of the recent cold snap we've been enjoying, my neck is really snuggy and warm. The other day I was perusing the scarves at the Barney's Co-op here in Brooklyn and was salivating over the beautiful Jo Gordon eternity scarves they had. They were really long and soft and beautifully designed. But they were also $235. Ahem. Each. Then I thought of my stash of felted wool, the one from which I conjured the little baby legwarmers and fingerless gloves that I've showed how to make in previous posts. Since both of those projects called for using the sleeves of the sweaters, I now had a perfect idea for what to do with all of those armless wool torsos.

Here's what I did.

First I selected two felted cashmere sweaters that had had the arms cut off and that I thought would go well together for a scarf. Here they are, side by side, on what I'm now realizing is my really ugly kitchen floor. Sigh.


Next I ironed them, and lined them up on my ironing board to prepare them for cutting into usable pieces. I started by lining up the ribbed bottoms. Then I used a yardstick and felt tip marker to mark out one big rectangle, and pinned it all around the perimeter before cutting it out. My rectangles each measured 31" across. The length of yours might be more or less depending on the size of your sweaters. (Also, keep in mind that you can make an even longer scarf using a third sweater and following the same directions that follow, repeating steps where necessary to accommodate another piece of felted wool/cashmere.)


I removed all of the pins, lined the two pieces up, (right sides facing, ribbed edges on the same side, too), pinned one end of the short sides, and sewed the two pieces together. Be sure to backstitch at the beginning and end of the hem to make it nice and strong.


Next I opened it up and ironed the seam flat.


Next. I folded the scarf in half lengthwise, right sides facing, and pinned the length of the edge. I sewed it together, again using backstitching to keep the seam strong.


I took out the pins and turned the whole thing right side out. Nearly there!

Take the two unfinished edges and line them up, pinning them together in the middle. Sew this seam together, and take out the pins as you go along. Now carry on sewing the seam together as best you can by carefully feeding the two edges under the foot of the machine. You'll know when its time to stop because you'll feel the edges getting too hard to pull through any further. This step might not make sense til to you try doing it. You'll wind up with and unsewn opening about and inch and a half long.


Finally, I hand stitched the opening closed with a whip stitch. Then I ran a hot iron over the whole thing to smooth it all out.


And I was done!


This scarf goes three times around my head/neck. I kind of wish I had used one more sweater to make it really long and luxurious, but I didn't have any other colors on hand that I thought would go together with these.
A trip to Goodwill may be in order.

Here's one more shot Henry took of me modeling my creation. This is my fake pensive look. Trust me, it beats my fake smile look. But I'm smiling on the inside.