Tuesday, December 4, 2012

Weird Science

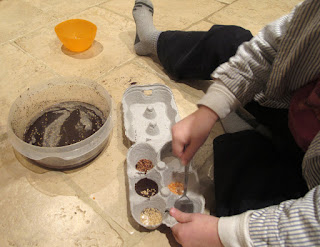
Lately I've been catching Charlie and Michael in the act of doing a lot of science experiments. What that means is that I find them quietly hiding out somewhere in the house with a bowl full of water, mixing in whatever ingredients they can find (steal) from around the house. These might be torn up bits of paper, some shampoo from their bath, food they've nicked from the pantry, and the like. I'm ashamed to admit that because I hate finding stuff like this spilled all over the rugs, my reaction to these healthy expressions of natural childhood curiosity are often less than encouraging. After school the other day, I realized that I needed to adopt more of a can't-beat-'em-so-join-em kind of attitude, and set them up with supervised science stations in the kitchen while I started making dinner.
In addition to a big bowl of water, I gave them each an egg carton with several different ingredients, and let them do their thing. Above, clockwise from top left are little pots of rice, lentils, sesame seeds, flour, coffee, and baking soda.
As they started to mix things into the water, I asked them to notice how the different ingredients behaved once they got mixed into the bowls. Did they sink (like coffee)? Or float (like sesame seeds)? What colors did they see in the water? Charlie noticed a shiny coating on the water's surface, and I told them about the oil from the coffee beans, and how it floats on top and shines.
The coffee made the water so dark, that soon they wanted to start with fresh bowls, so they each got one, to which we added some food coloring. I was SO happy the other day in the grocery store when I found this food coloring, which is made from plant and flower extracts, rather than the petroleum based chemicals that I still can't believe are in so many foods in the U.S. (In fact, so much of the candy and dyed foods I found over here use natural dyes, and I'm really baffled as to why American manufacturers haven't followed suit.)
After making basic observations about which primary colors blend to make which secondary colors, we started to add other ingredients to the water. Some vegetable oil was first, which made pretty patterns of blobs and bubbles. Next we added a few drops of soap, which made the bubbles run and hide, or cling to each other as if they were afraid of the soap.
I particularly loved this mossy green color that Michael got by mixing yellow and blue. 

As the days grow shorter (its getting dark by 4:15 here now), I'm looking for more moments and ideas like these to occupy my boys in the hours after school, when trips to the playground aren't so feasible anymore. As we've yet to break down and buy a t.v. since we've moved here, (but maybe after Christmas, so we can watch movies together), I'm needing to remind myself that the space for play with my kids needs more attention and inspiration than it used to. And that to get the ideas I need for creative interaction, I only need to follow their lead. 

Friday, November 2, 2012

Rey of Sunshine

One of the huge benefits of living in England is that fact that we now have all of Europe at our doorstep. Add to that the fact that good friends of ours have an amazing house in the south of France, and the answer to where we spent our kids' half term school break will be a no brainer. The house, called Domaine de Rey, is near Carcassonne, and is situated on a little hill with amazing views all around of vineyards and mountains, including the Pyrynees, which you can see in the distance in the second photo below.  (It's available to rent if you want to plan a really special holiday; the website for it is here.)

Our friends Dave and Rachel were gracious and generous hosts, and the kids got to free range it a lot of the time. We took lots of walks (often with Maggie and Rosie, pictured two photos down, who I want to kidnap), the kids climbed trees and hung out in their friend Joe's treehouse. We ate amazing food, and the kids and I collected a lot of pretty little nature bits.

Below you can see a selection of some of the things Charlie and Michael and I found outside. (Jake was mostly too busy learning to play rugby from Joe to do much collecting.) When I was a kid, I was a bit of a hoarder. Assortments of rocks, cotton (yes, cotton-as in cotton balls, cotton pads, cotton squares from cardboard jewelry boxes), and soap were among my most prized collections. The instinct to forage and collect is still strong in me, but these days I try to make stuff with the stuff I find rather than shove it all under my bed.
Last year at school Charlie learned about the artist Andy Goldsworthy, and his class made several field trips to Storm King Art Center, where you can see a beautiful stone wall that he designed. With his use of natural materials in mind, the boys and I spent some time making little sculptures of our own with our acorns and snail shells, both of which were in abundance.


We also foraged very carefully in the gravel around the gardens for stones that had white lines in them, with which we created this little beauty:
Michael added the little stone in the center that had a perfect little circle on it, as a finishing touch. Like many of Goldsworthy's sculptures, ours were impermanent, and dismantled as part of the clean up we did before heading home to England. 

The hurricane that hit the east coast while we were here rattled me, and I spent a somewhat sleepless night on Tuesday, six hours ahead of my family and in bed when the worst of the winds came, worrying for everyone's safety. The feeling of how fragile things are under nature's powerful forces hit me hard.

Fortunately my friends and family are all safe and sound, but I know that many others were not so lucky. To those families who are still picking up the pieces, we send our thoughts and prayers that life as you knew it before Sandy came will soon return to the way it was. 
Lesliex

Tuesday, October 16, 2012

The Royal Treatment

So it was another birthday party for another of my boys recently, which means I spent the week prior holed up in my studio like Martha Stewart on a crystal meth bender. A labor of love as always, though. I don't know whether its because I've been reading the "Game of Thrones" series, or the Queen's Jubilee was this year or what, but I've had royalty on the brain. I made felt crowns for Charlie's birthday party last year, but this year I made the goody bags a little more thematic overall, and also made each party goer a satin crown and a sparkly sceptre. The crown pattern and tutorial (which I simplified and modified a bit), comes from Jessica Levitt's Juicy Bits blog. I've included a tutorial in the post below for making the capes. For the sceptres, I cut and spray painted some wooden dowels (I also gently sanded the cut ends first), cut out two equal sized circles of glitter card stock and glue gunned them together onto the dowels, and tied a coordinating satin ribbon around them. May I give an official shout out and huge thanks to my sister-in-law Clarissa Astor, who spent two days helping me out and bringing me soup and good company. I couldn't have finished such nice party bags for twenty three kids without her help.

We had Charlie's party at the Village Hall, which is practically right across the street from our house. It's such a pretty building that the owner has restored so nicely, and it was a great venue for our bouncy castle, lunch and overall laissez les bon temps roulez. Most of the villages around here have village halls, which are of course places for residents to gather and share and celebrate and generally commune with each other.


I made a new birthday banner for my boy, and hung some felted coin bunting I was going to sell in my Etsy baby shop, but which I guess I'll now keep. Its so pretty though, this terrible photo doesn't do it justice.
In keeping with my royalty theme, the bouncy castle was also supposed to be an actual castle, but I don't think the kids particularly noticed, or cared.
Another cake I did not bake, but it was delish. 
 Charlie with his new bestie Alexander.

 Our new friend and neighbor Tilly, who looks ravishing in her royal garb.

If you'd like to make one of the easy drawstring capes shown in the photos, you'll need the following:
Satin rectangle measuring 22" x 28"
40" length of coordinating ribbon, 3/4" wide
Pinking shears
Safety pin
Coordinating thread

Begin by folding the top (22" wide side) of the cape over by about an inch. Iron the fold, then fold it down another inch and iron again. Pin your pocket into place.
Cut around the other three sides of the cape with a pair of pinking shears, to avoid excessive fraying of the material. You can opt instead to sew hems along the sides of the capes instead, but the pinked edges look just fine.
Next sew along the botton seam of the pocket you've pinned into place, as shown below.
Don't forget to backstitch at the beginning and end of your seam. Satin is slippery and tricky to sew. Don't worry if your fabric bunches up under the needle a bit here and there along the seam; it'll get hidden in the gathers of the collar later on.
Next take your ribbon, and fold one end over about half an inch, fold that piece over again, and stick a safety pin through the folded part. 
Starting at either end of the cape, thread the ribbon through the pocket you've just sewn along the top of the cape by repeatedly pushing the (closed!) safety pin through, gathering the fabric, and pulling the ribbon along til you've come out the other side.
Remove the safety pin, and snip off each end of the ribbon at an angle with pinking shears. Pull the ribbon through the pocket of the cape until you've got a nice gathered collar, and you've got equal lengths of ribbon coming out of either side of the opening.
Don't pull the ribbon through too tightly; the cape should hang nicely around your child's shoulders without being to constricted around the neck, but also have nice pleats and gathering. When you've found the right length, sew the edges of the pockets closed so that the ribbon will stay put.
And that's it. This cape took me about 20 minutes to make. I wish my kids wanted to wear these getups for Halloween. Alas, I've got to figure out how to make one Sabre toothed tiger, one Secret Agent Spy and one Tin Tin costume within the next two weeks. I'll see you when I come back out of my next crafting bender.

Friday, October 12, 2012

The Lure of the Local

If we were still living in America, we'd have no doubt by now had our annual outing to our favorite orchard in western Massachusetts, where we'd pick our own apples and pumpkins, drink too much cider and eat too many cider donuts. This year the landscape is a little different, and we've been picking fruit all over the place. From the side of the road, on public footpaths, and from fruit trees on the family farm. There is really nothing like fruit from the vine, which is something we just didn't get enough of as city dwellers. The other day, Jake and I were running errands when we pulled over on the side of the road to do one last bit of blackberry picking before the season ends. The view above was from where we parked the car, and the road ahead was lined with bushes like these:
 Jake was a bit like the little girl in Robert McCloskey's "Blueberries for Sal"; one berry in the bucket, and a whole handful of berries in his mouth.
 But in no time, we filled our modest little container, and headed home.
 This morning, Michael came with me to my studio, which is situated on the property where we're going to be moving soon. (Either to renovate a little house that sits there now, or to build something new-long story, more will be revealed.) In the garden in front of the house were these little beauties, which we grabbed a few of on our way out.
 The ones on the ground are usually pretty good, too.
 Also, Michael found what looked like the last rasberry on the scraggly little bush outside of our kitchen. I've been eating them for the past month.
 When we got home, we set to work making an apple and blackberry crumble. I recently made my very first pie crust from scratch, thanks largely to the Magimix that my husband's late grandmother left to me when she passed away. (I was so touched by that gesture I nearly burst into tears when I found out about it.) Between all the fruit we've been gathering and my newly acquired baking skills, I've been making a lot of crumbles lately.
 Michael was my apple chopping helper.
 Here's the mixture in the crust.
 And here's the crumble topping, which I got from Martha Stewart's Pies and Tarts book.
And here's what we're having for dessert (sorry, "pudding") tonight. Yum, yum.

Wednesday, October 10, 2012

Freezer Paper Printing Project: Linen Napkins


If you've never done printing with freezer paper stencils before, you're missing out on one of the easiest and most satisfying ways to print that I know of. In the past, I've found this method somewhat limited, because cutting out detailed stencils with an x-acto knife can be laborious and frustrating. As a result, I never attempted stencils that called for anything other than large and simple shapes. But today I was fiddling around in my craft bins and decided to put my Martha Stewart paper punches to new use as stencil makers, and the result was lovely.

To make the linen napkins shown, you'll need the following:
Freezer paper (also sometimes called butcher's paper)
Paper craft punch-I used the Martha Stewart "Stained Glass" puncher
Cutting mat and craft knife
Fabric or acrylic paint
Linen napkins (I made mine with hemmed pieces of linen measuring 19 1/2" long by 16" wide)

To begin, cut out strips of freezer paper 15 1/2" by 3"; you'll need one for each napkin you're printing. With the shiny side of the paper facing down, line up the left edge of the paper (only cut through one piece at a time) with the left edge of the paper punch, and leaving equal amounts of space between the top and bottom of the punch.
 Begin punching the paper all the way across the length of the strip. I had room for eight continuous punches. There is a place on the edge of the puncher where you line up the previous punch so it'll be exactly aligned with the next one.
At times the punch didn't quite cut clean through each shape. If this happens to you, just flip your paper over and carefully cut any stray bits away with a sharp crafting knife. 
When you're finished punching out your stencil, place the freezer paper SHINY SIDE DOWN onto the fabric, and iron it on. This is the magic of freezer paper, that it temporarily adheres to fabric with an iron, but peels away easily when you're done printing.  Just make sure you take care to iron all of the little bits down onto the fabric, or else ink will seep in under your stencil. I used a medium high setting, no steam.
Now comes the printing part. Take a blob of paint and a stiff brush with a flat or round head, and start stippling the paint over the stencil. You might want to try this on a test piece of fabric first til you get the feel for how much paint and how much pressure to use to achieve good results.

Let the paint dry thoroughly before gently peeling back the freezer paper. The paper can only be used once, so discard it when you're done. 
And that's it! Now you've got some spruced up linen napkins that were deceptively easy to make.