Tuesday, December 17, 2013

Hand Sewn Tea Bags

Spare time has been scarce around here lately, as my kids have been out of school since last week. But this morning I had a sitter for a couple of hours, so I snuck into my shed to see what I could make for a few of the grownups whose names are not yet checked off of my Christmas list. 
I dug out this bag of chamomile flowers that I picked in June, which I'd dried out and stored in a jar. I decided to make some tea bags for my mother in law, and I popped them into this pretty tin that I picked up at a garden center a few months back. Want to make some, too? Here's how you do it:
Using some lightweight and inexpensive muslin from my fabric stash, I cut out a bunch of four inch squares of fabric. Notice how this muslin has a pretty loose weave, so it'll actually work for brewing tea (I hope). 
Fold each square in half, and sew along two of the three open sides, using small stitches. 
Turn the bag right side out, and fold the top edge inwards by about half an inch.
Crush up your herbs. For the chamomile, I just used the leaves and yellow flower heads, but left the stems and dried flower cones out.
Scoop the crushed up flowers into a piece of paper and carefully pour them into the bag. I used five or six flowers for each bag, which filled it about half way up. I wanted there to be room for the water to flow through the chamomile so I didn't overstuff them.
Now sew the bottom seam shut, and repeat until you have as many bags as you have room in your chosen container for. If you don't have a tin lying around, you could use a jam jar, as shown. Just find something to keep the air out of the container so the tea doesn't lose it's magical powers.
If you didn't remember to harvest your local chamomile flowers in June (that's a joke), you can still make some of these pretty and thoughtful gifts. There's no shame in grabbing some fresh mint or lemon balm at the grocery store, which you can dry at home for a few days and add to these little bags. A slight cheat: buy a couple of varieties of herbal tea, make your own blend (right now I'm loving cinnamon and fennel) and repackage them in cloth bags. Cheesecloth is also muslin, by the way, and about the right weave for this project. Don't forget to hop onto your computer and whip up some pretty labels to stick on your jars. And if you'd rather just bookmark this idea for next year, think about planting some of the herbs found in this link so you can plan ahead.

Tuesday, December 3, 2013

Handmade Holiday Gifts for Kids: Making Meditation Cushions

It was tricky thinking of something I could make my kids for Christmas this year. If I'm honest I have to admit that what they're really into right now are action figures and instruments of war. They're peace loving souls on the inside, but they're also little boys. In the interest of fostering the peaceful soul aspect, I decided to make them each their own meditation cushions. If that sounds an unreasonable and mean thing to give a kid who loves his Teenage Mutant Ninja Turtles, just stay with me for a second. 

Last July, we spent two weeks in France at a buddhist family camp. While most of our time there was spent chilling out, swimming, walking and getting to know other families, there was plenty of time, too, for sitting. In the mornings after breakfast the families gathered together and engaged in some fun and playful mindfulness exercises, then the adults had a couple of hours to sit, with instruction, while the kids played elsewhere.
Something must have rubbed off. I took this candid (I swear) photo of Michael a couple of months ago. I just found him sitting there in the hall, just sitting there! And once in a while, when we think to do it, we all gather in the living room in the morning to sit for a minute and ring the singing bowl. The practice is just to listen quietly to the sound of the bowl until it goes silent, at which time you hold up your hand. When everyone's hand is up, the practice is over. Its not intense or perfect, but its a practice of sorts.

Anyhow, back to the meditation cushions. I made these envelope cushion covers for 16"x16" square pillows. I used linen, silk and velvet, only because I happened to have these materials in my fabric stash. You can use whatever materials you like. These cushions don't offer a lot of support for longer sitting (get a stiff, foam filled meditation cushion if you're in the market), but the kids don't sit for very long so they're fine for now. Here are the instructions for how I made them.
What you'll need:
1 12"x12" square of fabric for the front center (I used linen)
2 strips of fabric cut to 3.5" x 17" in one color (I used linen)
2 strips of fabric cut to 3.5" x 17" in coordinating color (I used silk)
1 piece of silk (or fabric of your choice) cut to 14"x17"
1 piece of silk (or fabric of your choice) cut to 8"x17"
Straight pins
Ruler or tape measure
Hot iron
Sewing machine
Coordinating thread

To begin:
1. Pin the first pair of long strips into place. With your center piece face up, line first strip along the top edge (right sides facing) of the square, making sure that the overhang on each side is 2.5" long. Pin into place, repeat for bottom strip. Sew both strips on using a 1/4" seam allowance.
2. Flip the sewn piece over and iron open the seams. Iron all the way along the edge of the strip, including the overhanging pieces. 
Flip your piece back over (right side up). It should look like this. 
3. Repeat step one above, pinning and sewing the second set of long strips along the edges of the linen square. Be sure that you're pinning to the front side, right sides facing, edges lined up as in the photo above. Sew all along the strips, including the overhanging pieces which will match up in length when sewn together. 
4. Repeat step two above, ironing all seam allowances and making sure the back side of your cover is nice and flat. Your finished front cover will look like the photo above. (Note that in this photo an extra purple strip has appeared. This is because I measured my strips incorrectly the first time around and needed to add some extra width to my border. Stick to the measurements I provide above and you shouldn't have that problem!)
5. Hem the edges of the back cover pieces. Fold the shorter edge (i.e. the 8" long side of the 8"x17" piece) over by 1/4", iron and fold again. Pin into place and edge stitch. Repeat for the 14" long side of the second piece.
6. Now pin those pieces, front sides facing, onto the front piece of your cover. Place the long side down first, then the shorter piece on top, as in the photo above. Pin all around the outside edge and sew the whole thing shut using a 3/8" seam allowance.  
7. Turn the whole thing inside out, using a chopstick or similar to turn your corner points all the way out. Iron the whole thing, and insert your cushion. 
And you're done. Next week the kids break up from school for the term, so I'm glad these are finished. Now that they'll be home a lot, I'll have some helpers around to assist me in gift making projects for my extended family. Look out for lots of apothecary inspired gifts coming down the pike here soon.


Saturday, November 30, 2013

Making Cardboard Castles

In part because Christmas is coming and also because we live in the boonies and order stuff online quite a bit, we have a bumper crop of cardboard in the recycling bin this week. Today we were hanging around at home and Charlie, who has been studying castles and knights at school, asked if we could build a castle. He wanted to make it out of play doh, but I convinced him that cardboard would be a little more structurally sound. 
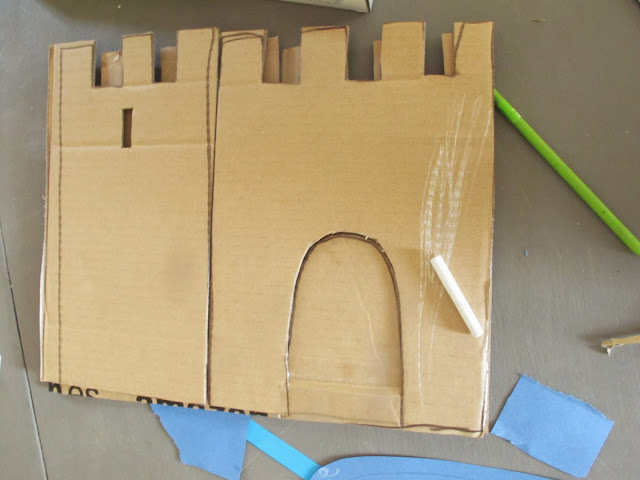
I'm not much of an architect but my kids aren't all that demanding about these sorts of things. I cut up some boxes with an Xacto knife, cut out some rectangle shapes along the top edges, and cut out some drawbridge doors.
The little slit windows were Charlie's idea. He also wanted to include a keep, but then got sidetracked making little flags. 
Above is the inside part, which I attached with cardboard tabs and then bigger strips of tape. 
And here is Charlie's St. George's cross made with a toothpick and tape. 
Charlie was so pleased with my level of compliance today that he made me a sticker chart. I now earn a colorful dot for each new thing I make for him. I'm not sure what I get to cash them in for later, but its definitely an effective motivational tool. 
This was the dining room table tonight before everyone went to bed. The zest for building and embellishing the castle had given way much earlier to actually playing with it, and some knights and other action figures were enlisted into fierce battle. 

Cardboard structures are a frequent go-to crafting project at our house. There is generally a steady supply of material at hand, we don't need much in the way of other materials (usually some tape, a cutting mat and xacto blade, and some imagination). Often their request for cardboard toys follow a current interest. For instance during their Wallace and Gromit phase last year, they wanted a to build a rocket ship after watching "A Grand Day Out". Here's what we came up with for that:
One of the other great things about cardboard toys? When the novelty of playing with them wears off, they go right back into the recycling bin. 

Wednesday, November 27, 2013

Handmade Holiday Gift Idea: Custom Embroidery Kit for Teen Girls

I'm trying to get a little bit of a jump start on Christmas gifts this year because, where appropriate, I want to make as many of them as I can. Today I put together this custom embroidery kit for my niece, Eva, who is twelve. (I'm pretty sure she doesn't read my blog, so hopefully I'm not ruining any surprises here.) A few weeks ago she casually asked me if I could teach her how to embroider, and I tried to act all cool and nonchalant and said "Sure thing", when inside I was jumping up and down with excitement. Though I try to infect my boys with the crafting virus at every opportunity, they have for the most part remained immune to the lure of needle crafts. 

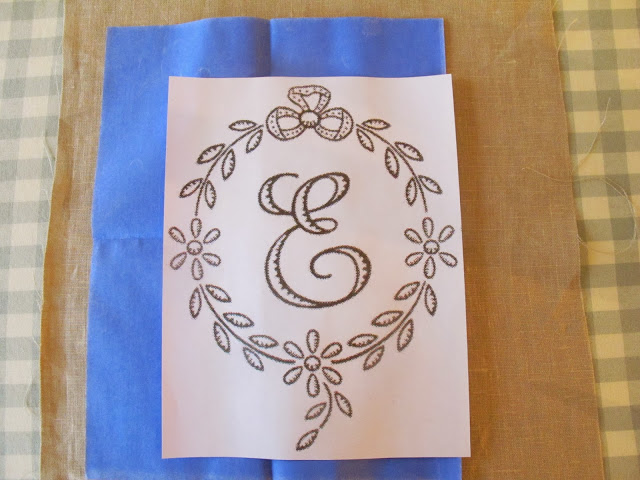
For this kit I've included a hoop, some needles, a few skeins of embroidery floss, some pretty scissors, and two pieces of linen. One piece is plain, to learn her stitches on, and on the second piece I traced a pretty letter E with a floral border that I got from this book:
To transfer the letter to the linen, I scanned it into my computer, enlarged it to fit the piece of linen I wanted to use, and traced it right onto the fabric using embroidery carbon paper. I put everything in place for tracing, then taped it all down onto the table so it wouldn't move around. 
This picture doesn't show it, but I also taped the carbon paper to the linen and taped the letter to the carbon paper. Notice the carbon paper is right side down, the letter is right side up. Then I traced the whole thing. 
So here's the tracing on the linen, so she can stitch right on top of the lines. 
I had to include a close up of these gorgeous embroidery scissors, which were hard to resist keeping for myself. They cost about ten bucks, bringing the total cost of this gift to about $13, or £8.50 I also included a tagged card that tells her this gift includes free embroidery instruction with me, which, of course, is priceless.

If you're making gifts for anyone this year please share your ideas with me. I'll be adding more of my own as my holiday making plans kick into gear. To my American friends, have a very happy Thanksgiving tomorrow. Even though we won't be officially celebrating here, I'll be counting my blessings as always. 

Friday, November 22, 2013

How To Make A Simple Felt Christmas Tree Garland

While tidying up in my studio today I came across a bag of felt strips leftover from a chain garland I made for our Christmas tree a couple of years ago. That garland has since gotten a bit stretched out and doesn't look so great anymore, so I thought I'd make another this year out of the scraps. This project took me a little over an hour to make, and because the little squares are easier to roll up for storage than the chain was, I hope this will have a longer lifespan.

Here's what I did:
Unless you have a bag of wadded up pre-cut felt strips lying around, you'll have to start by making some. Using sheets of craft felt (or real wool felt if you're feeling rich and/or fancy), use a rotary cutter or scissors to slice up the felt into strips an inch wide.

Iron your strips (if needed) and line them up in the order you'd like your colors to go. You can put them together totally randomly, of course, but I wanted mine to be in a repeat of the colors above.
If you have a big self-healing mat and a rotary cutter, you'll be able to line up your strips and cut them into one inch squares lickety split. If you need to cut by hand with scissors, go ahead and eyeball the size of the squares and cut a few strips at a time. It took me just a few minutes to do it with a mat and cutter, like so:
First I squared the ends of each side so they were all exactly 9" across.
Then I whizzed down the rows following my lines, nine times, til I had...
...this.
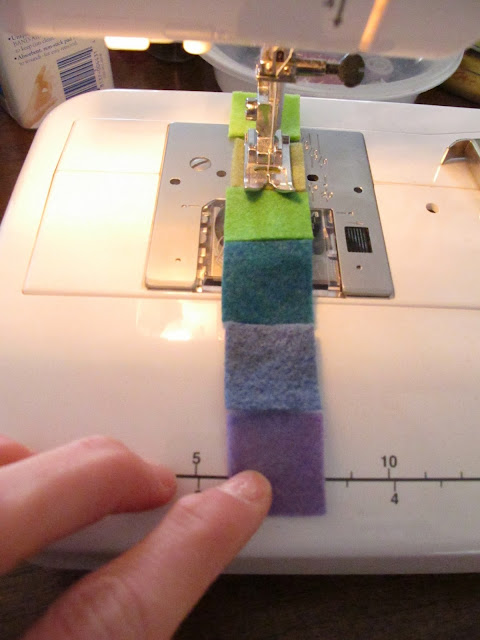
Then I started feeding them through my sewing machine, lining up a few at a time, and making sure that each subsequent square got caught under the presser foot as close to the one before it as possible. Once a square was caught under the foot, I could just keep feeding the next one in, til the next thing I knew I had...
...this. I did three batches of ten 9" strips, so had a total of 180 squares which makes a 15' long chain. If it isn't big enough for our tree, it'll take me no time to whip up another one.

Here it is hanging up in my studio. We haven't gotten our Christmas tree yet, but, lucky us-there is a Christmas tree farm here on the farm. Once we get ours up and decorated I'll add another photo of this garland in its rightful place.

Monday, October 28, 2013

Piglets!

Back in the spring of last year, we got our first pigs here on the farm-two Gloucester Old Spots. Yesterday morning, one of them gave birth to ten piglets. The ironic thing about newborn piglets is that they come out all together, encased in a birthing sac, like sausages. Then one by one, they pop out and separate. Once they start feeding, they each choose a teat from their mommy, and like a sippy cup marked in indelible ink, they use the same one for the rest of their nursing careers. They are incredibly organized animals.

I was at my son's rugby match when the actual birthing took place, so I don't have photos to share from yesterday's excitement, but I think mommy pig deserves a big round of applause for her amazing delivery. And a big thanks to our neighbors Kitty and James, who are lending us space in their barn for the happy new family to stay for a while, til they're big enough to move up to the pen in our field.

Friday, October 25, 2013

Conker Season Is Here

When my husband was a kid, the thing he most looked forward to every autumn was conker season. Conkers is one of those games that fills Englishmen of a certain age with wistful nostalgia, and Henry is among them. While he was showing our boys how to string them up and play, he started reminiscing about the various methods he used to make his conkers stronger; things like soaking them in vinegar and baking them in the oven. He even remembered having made a clay sculpture at school of the inside of a horse chestnut seed, which I promptly ran to my in-laws' attic and found. 
Now I'm using his conker sculpture to display the conkers my kids keep bringing into the house.
I keep finding them all over the floor, on the table, in the kitchen. Jake keeps his own bowl of them on his desk. They're so pretty, I don't really mind. But I know that soon some other interest will supercede this one, and the conkers will slowly disappear. Til next year, anyway.

To play conkers, you'll need at least one other player, and you'll each need the biggest and best looking horse chestnut you can find, and a shoelace. Ask your grownup to find a sharp something, like an awl or meat thermometer or similar, and poke a hole from top to bottom right through the middle of the nut. 
Push a shoelace through the hole, using your awl or tool to guide it. Tie a knot or two to the bottom of the string as shown below. 
Now you're ready to play. Each player takes a turn whacking the other person's conker, with the ultimate goal of whacking the opponents' conker off of his string. For each conker you succeed in dispatching, you get a point. If you've knocked off one conker, your own conker is now designated a "onesie", two and you've got a "twosie", and so on. Henry claims to have once had a "twentythreesie". 

 Above Jake demonstrates shooting, while Henry demonstrates holding his conker out to be hit.
My boys have been on break from school this week, but I suspect next week they'll be sneaking their conkers into school so they can play with their friends. 

If you played conkers as a kid, I'd love to hear about any tricks or tips you can share with my boys. Since they're half American, they have a bit of learning curve to overcome.